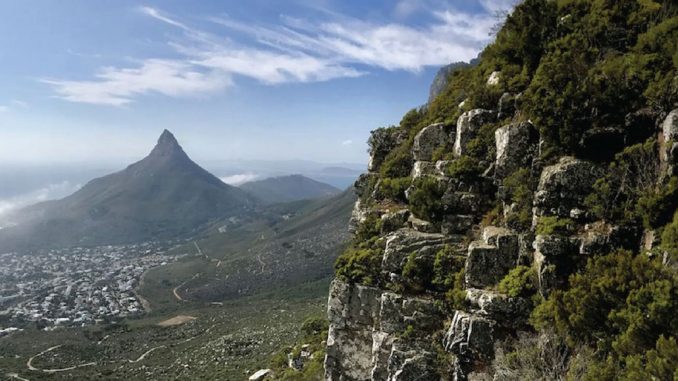
Lockdown is slowly being lifted and with your new found freedom you are trying out an array of new hobbies and really living life to the full! Next on the agenda? Hiking of course! Why? Because after being confined to your home for over a month you’re in desperate need of some fresh air, plus you’ve lived in a city with Table Mountain looming over you for years and now definitely seems like the time to tackle it. The problem is, you have no gear and no clue where to begin with your new challenge. Luckily CityROCK has got you covered with all you need to know.
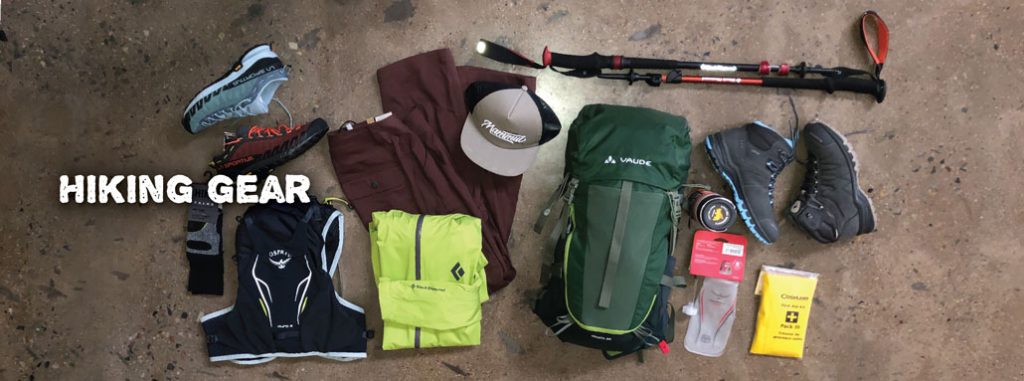
Let’s cover some basics. For any hike you’re going to want a pair of comfortable shoes to walk in. No slops here! I promise, your feet will thank you later! In a nutshell, hiking boots are great for long distance as they are durable and well padded. The ankle support is imperative with the added weight of backpacks, however they can be bulky and heavy for day hikes. Approach shoes on the other hand are much lighter and perfect for scrambling up more technical terrains but do not perform as well over long distances.
A great approach shoe is the LaSportiva TX2’s, they offer good support, look cool and have a great tactile sole for extra grip on rocky scrambles. Both come in men’s and ladies’ versions. For a new hiker the best shoe to be looking at is probably a combination of the two which is currently the Mammut Mercury III Mid GTX (Men) or the Mammut Nova III Mid GTX (Women). These hiking shoes are part of Mammut’s light hiking series, all the comfort and durability of a hiking boot with a vibram sole which aids in its gripping technology. These shoes are definitely worth investing in if you plan to hike more frequently.
If you want a more in depth look into what kind of shoes you may need for different terrains take a look at our previous blog on ‘What shoes are right for the great South African outdoors?’
The next thing you absolutely must have is plenty of water, because even on a winter’s day the front side of Table Mountain can become scorching hot. The Osprey Hydraulics Soft Flask (500ml) is great as it fits into any Osprey Pack. An alternative, if you fancy a cup of tea at the summit or you love ice cold water investing in a Stanley Go Ceramivac Bottle (0.47L) is a good idea, it keeps liquids hot for 4 hours and cold for 7 hours. These hydration options paired with a nice lunch at the summit make for a good rest before heading back down the mountain, hiking or via cable car.
Weather on the mountain can be quite erratic so always have an extra waterproof jacket with you, if you’re searching for a good all-rounder the Black Diamond Stormline Stretch Rain Shell is the perfect investment as it is Black Diamond’s waterproof, breathable, windproof solution. Most packs come with a built in rain cover but if you don’t have one it is great for keeping your pack dry in an event that the weather suddenly turns. Another cool addition to being prepared is a Sea to Summit Dry Sack (sizes ranging from 1L all the way up to 35L) that can keep your phone and valuables dry even if your whole pack gets wet.
Last but not least, a comfortable day pack is a must to make carrying everything a breeze (I have admittedly tried hiking with a supermarket packet, it is not a fun thing to do). 20 to 35 litre packs are a reasonable size for a day pack, therefore the Vaude Brenta 25 is a great pack to investigate. Not only does it have ventilated mesh back and shoulder straps (perfect for those hot days) it’s also made from sustainable materials which is way more eco-friendly than the supermarket packet! Bonus features include a built in rain cover and a convenient opening for a hydration system.
Not surprisingly Table Mountain has a variety of different hikes that you can choose from, and with the cable way open to hikers for one way trips down the mountain, you only need to choose a route up taking into account your hiking abilities. I strongly suggest planning your route beforehand and making sure you know which paths you need to follow during your hike, this will also give you a good idea of what to expect on the hike. I would recommend investing in a copy of Table Mountain Classics by Tony Lourens as it covers all known hiking routes up Table Mountain with a comprehensive description of the route, what you need and the routes difficulty. It is also nice to have the guide book available to you during your hike should you find yourself on the wrong path.
For the purpose of this article I have chosen three different hikes on Table Mountain ranging from novice to advanced hiking abilities so that it is easier to decide which one suits you best. All of these hikes are similar in distance and link up to the cable way which you have the option of taking down if the weather permits.

PlatteKlip Gorge is the most straightforward of all the hikes with an established path you can hike up confidently knowing you are on route. It is also the easiest of the three routes so if you are new to hiking this is the route for you. It is also a great pick for families as it is child friendly. It is shady in parts of the route but a hat or cap is a good idea for the sunny spots. This path is an easier route to take down the mountain should you not have the option of taking the cable car. Features include Watsonia flowers along the path (if you’re hiking between September and January) and beautiful rock formations closer to the summit as the gorge narrows.

India-Venster is around about a grade higher than the Platteklip hike, therefore if you’ve already been up Platteklip and you’re looking for something a little more challenging, without putting yourself in the deep end, this is a natural advancement to choose. It is important to wear approach shoes as there are areas along the route that require some scrambling and there is a section of vertical rock pitches that you will need to work your way up. Chains and staples have been installed to make it safer for hikers up the route, but, it is more reassuring knowing that you can trust your own shoes to stick to the rock as well. The most important thing is to be prepared for the route – make sure you are following the right path, ensure you are wearing appropriate shoes and if you are a little nervous, there is no harm in asking a seasoned hiker to accompany you. The feature to look out for is the venster (window) which is a rock formation, sure to frame anyone perfectly for an awe inspiring photograph!

Kloof Corner Ridge is the hardest of all hikes with 3 pitches of scrambling and hiking. Seasoned climbers are sure to scuttle up the pitches like Dassies or Cape Skinks, however, for the average hiker this will prove to be quite a technical ascent with exposure that can be quite overwhelming. This is why it is suggested that you make use of a rope on the pitches if you are nervous and also have someone who knows the route with you so that you are headed up the right way, even though the guide book gives a clear step by step indication of what to do per pitch. Again, approach shoes are highly recommended as you want footwear that will stick to the terrain you will be on for a large amount of your ascent. Features include the 11 inch crack which is on the last pitch and breathe taking views either side of the ridge. One side overlooks the city in all its glory, and the other side overlooks the Apostles and the Atlantic coastline, the perfect juxtaposition of the metropolitan and nature at its best!
Shoes on, water bottle and snacks at the ready, a delicious pack lunch, a flask, a spare jacket, valuables in a dry bag… Am I missing anything? Yes! A Coghlans First Aid Kit Pack III, which fits perfectly in the front pouch of your pack. Now that you’re kitted out with the right gear and have more or less an idea of the level hiking you are able to do… I mean this in the nicest way possible, seriously what are you waiting for? Take a hike!
Warning
Kloof Corner Ridge is considerably harder and more technical than India Venster – there are multiple sections where a mistake will result in serious injury or death.


Be the first to comment